Last fall, after another dismal harvest, I made the decision to switch to raised beds. I was fed up with fighting against the abysmally poor soil in our area year after year. After considering my options for building vs. buying raised beds, I chose to go with these Vego Garden 9-in-1 modular raised bed kits.
And then I bought nine of them.
Here’s what I learned after setting them up.
My Gardening Needs
First, I want to briefly discuss my gardening needs, so you can understand why I chose these particular raised beds and what I need to get out of my garden. Obviously, I wanted something sturdy that would last, but so does everyone, and these kits certainly fit the bill. However, there were a few additional needs that I had to consider.
Space that doesn’t take up a lot of space
You may have noticed that, as the main contributor and editor-in-chief of Rural Sprout, having a garden is somewhat important to me. (Shocking, I know.) Aside from growing food, I do a lot of testing in my garden so I can pass on what I’ve learned to you, my favorite gardeners on the planet.

Cat tested and approved for naps in the warm dirt.
I need plenty of space to try out new varieties of seeds, experiment with different methods for staking or growing plants vertically, and test various fertilizer brands and pest control methods. (The owner of Rural Sprout is always much more excited about new pest problems than I am.)
In the end, I needed enough space to ensure a harvest I can preserve for me and my family and still have enough space for a Rural Sprout Test Garden without everything taking up the whole yard.
With these modular kits, I had plenty of options, nine to be exact, when it came to size and shape. And if I really wanted to, in the future, I could tear them down and put them together in a different configuration.
Is it aging-gardener friendly?
As I write this, I am four days away from turning 46. Now, I don’t consider myself old, but my knees certainly like to remind me that I’m not young either. The thought of gardening at ground level these days has me reaching for the Ibuprofen before I even get to the garden.
I knew I wanted something a little taller than the usual 12” high beds I see people building. The Vego Garden raised bed kits come in several heights: 11”, 17” and 32” tall. My cranky knees balked at the 11” height, and my pride at the 32” tall beds. So, 17” high beds it was.
This height allows me to bend over without too much fuss, or use a kneeling pad (I love my Gorilla pad!) and have everything easily within reach for more substantial work.
Can I put it together by myself?

I got plenty of help on Mother’s Day, but I wanted to be sure I could put them together on my own if needed.
This last one was a biggie. I live by myself, and while my teenage boys could help some, they weren’t always available to do so. So, I wanted to be sure that whatever I got myself into, I could put it together on my own without too much difficulty. The Vego Garden modular raised bed kits are incredibly easy to assemble. Honestly, the hard part was choosing what shape I wanted to make them.
Important Lessons I Learned
Here are a few things I learned that might help you, should you decide to pick up a Vego Garden raised bed or two. Or nine.
Pay Attention to the Sun
When I moved into my new place last year, I made it a point not to do too much with the flower beds or set up a garden. I had no idea what areas of the yard would be shaded at what times of the day and during the growing season.
My plan was to pay attention and take notes throughout my first summer here, so I would have an idea of the areas of the lawn that received the most sun.

If you’re putting in a new garden, make friends with your local bike shop; they have huge boxes!
It was well worth the wait, as now I have my garden set up in the optimal spot, and I don’t have to worry about any surprise shady spots because it’s much harder to move raised beds once they’re filled with dirt.
Grab Your Earbuds and Set Aside Some Time
While the beds themselves are quite simple to assemble, they do take a while to put together. Don’t go into this thinking you’re going to have a fully assembled raised bed in ten minutes. The instructions are easy to follow, and no special tools are required. I found that I could assemble a single bed in the largest configuration in an hour, moving at a steady clip.
If you’re assembling more than one bed, I highly recommend an audiobook or queueing up a few episodes of your favorite podcast.

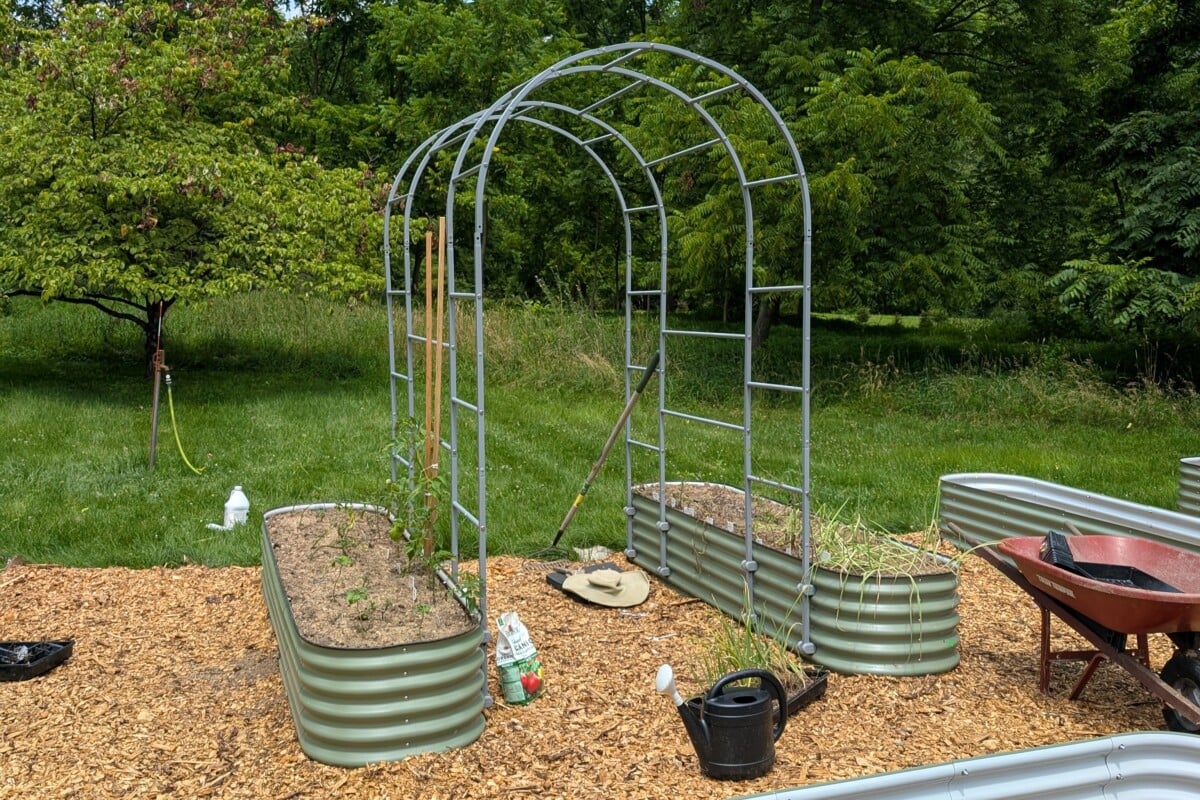
Just Buy the Vego Garden Trellis
Vertical gardening is always a win. It’s like getting extra growing space for free. Plus, if you plant them profusely, you can get some lovely, shaded paths to walk under with arched trellises.
I knew I wanted trellises for my raised beds. I always string-train my tomatoes, cucumbers, and other climbing vegetables. I’m also hoping for a shady spot to put a bench, so arch trellises were a must.
Again, as I did with the raised beds, I spent weeks poring over DIY tutorials on YouTube and elsewhere. Our own Lindsay has even put together a brilliant tutorial:
How to Build an Arched Trellis with Cattle Panels
In the end, I knew that time was my most precious commodity. Rather than spending time running around to pick up materials to make trellises and then having to assemble them while setting up the raised beds, I bought the Vego Garden arched trellises that go with the raised beds.

They are designed to attach to the modular raised beds, so I didn’t have to worry about anchoring homemade trellises. They were really easy to put together, even by myself, and they’re incredibly sturdy, too.
Fill Them Halfway with Wood

When I started pricing soil for the raised beds, it looked pretty spendy. (Again, I was filling nine beds in total.) I knew I could easily cut my costs in half by using the hügelkultur method.
A tornado came through my backyard this spring, so I had easy access to wood chips due to all the tree cleanup in my neighborhood. But you can easily get free wood chips via ChipDrop or by calling your local tree care company. I also used some old firewood that had been sitting around.

If you wet it down well before adding the soil on top, wood acts like a giant sponge at the bottom of your raised bed, holding in moisture so the soil doesn’t dry out as quickly. The wood slowly breaks down over time, adding nutrients back to my beds as well. So, a win overall.
Things I Would Do Differently
Would I do anything different if I had to do it all over again? You bet.
Go Taller, Maybe
I kind of wish I had swallowed my pride and opted for the 32” high beds. I have a feeling that as the years progress, the 32” high beds will be more manageable. But I’m pretty active and I (try to) take good care of myself and maintain my mobility as I age. I think I’ll be alright for the foreseeable future.
I’ve also come to the conclusion that if gardening gets harder, I’ll likely do less of it. So, I may yet pick up a 32” high raised bed kit or two for a smaller garden overall.
I’ve even been eyeballing Vego Garden’s new Elevated Garden Beds with the storage underneath. These stand 32” tall, but are only 12” deep, so they’re less expensive to fill with soil. And you have built-in storage space beneath, making them perfect for your patio. These are a perfect option for those who wish to garden but are limited by mobility and space.
Ask For Help
Filling the raised beds was the hardest part. By that, I mean the actual labor, not the cost of soil.
I’m not unaccustomed to hard work by any means. But because I had eight beds to fill this spring (I set one up last fall), that meant a whole lot of shoveling and moving wheelbarrows full of firewood, wood chips or dirt back and forth.
Between the rainy spring we had and how busy I am this time of year, it was slow going filling all the beds. I think if I had to do this again, I would hire some teenagers (mine or otherwise) to do the grunt work. It would have gone a lot quicker.
Now, if you’ve only got 1-3 beds to fill, it’s a different story. But anything more than that, and you may want to consider calling in reinforcements.
Get Crazy With the Shapes

I ended up choosing to build most of my beds as 2′ x 6.5′ for comfort and ease. I did two in the largest configuration, 3.5′ x 6.5′, one to be a dedicated herb bed and the other for larger plants like pumpkins.
It occurred to me only after I started filling my raised beds that, since I had purchased nine kits, I had quite a few more options for setting them up. I found numerous Instagram and Pinterest posts showing how people had connected one or more kits to create L-shaped, C-shaped beds, and more.
Had I known that from the start, I think I would have opted for a more interesting layout. Ah well. I suppose I could expand next year…
The post What I Wish I Knew Before Buying & Setting Up 9 Vego Garden Raised Beds appeared first on Rural Sprout.